Recognizing the signs of a dead car battery is crucial for any vehicle owner. A battery typically fails when it can no longer hold a charge, which can manifest in several ways. Common indicators include the engine failing to start, dim headlights, or electrical components such as the radio or dashboard lights not functioning properly. In some cases, you may hear a clicking sound when turning the ignition key, which is a clear sign that the battery lacks sufficient power to engage the starter motor.
Environmental factors can also contribute to battery failure. Extreme temperatures, both hot and cold, can significantly affect battery performance. For instance, cold weather can reduce a battery’s capacity by up to 50%, while excessive heat can lead to accelerated evaporation of the electrolyte solution inside the battery. Understanding these signs and factors can help you determine when your battery requires immediate attention or replacement.
If you’re looking for additional tips on maintaining your home environment, you might find this article on caring for snake plants particularly useful. While it may not directly relate to jump-starting a car, understanding how to care for indoor plants can enhance your overall well-being and create a more pleasant atmosphere while you tackle tasks like reviving a dead battery. Check out the article here: Top 10 Tips for Snake Plants.
Gathering the Necessary Tools and Equipment
Before attempting to jump-start a vehicle, it is essential to gather the appropriate tools and equipment. The primary item needed is a set of jumper cables, which typically consist of two insulated cables with alligator clips on each end. It is advisable to invest in high-quality cables that are at least 4 to 6 gauge in thickness for optimal conductivity and safety.
In addition to jumper cables, having a working vehicle with a fully charged battery is necessary. This donor vehicle should ideally be of similar voltage (12 volts for most cars) to ensure compatibility. Furthermore, it is beneficial to have safety gloves and goggles on hand to protect yourself from potential acid spills or electrical sparks during the jump-starting process. A flashlight may also be useful if you find yourself in a low-light situation.
Preparing Both Vehicles for Jump Starting

Preparation is key when jump-starting a vehicle. Begin by positioning both cars close enough so that the jumper cables can reach both batteries without stretching or straining. Ensure that both vehicles are turned off, with keys removed from the ignition, and that they are parked on a flat surface away from traffic.
Next, inspect both batteries for any visible damage or corrosion. Corrosion appears as a white, powdery substance around the terminals and can hinder the connection between the battery and cables. If corrosion is present, clean it off using a mixture of baking soda and water before proceeding. Additionally, ensure that both vehicles are in “Park” (automatic) or “Neutral” (manual) to prevent any unintended movement during the jump-starting process.
Connecting the Jumper Cables Correctly

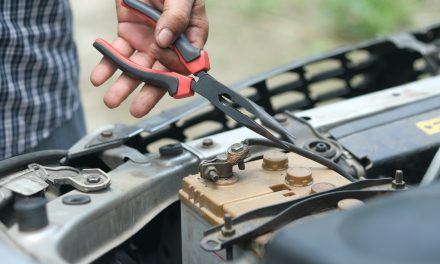
Connecting jumper cables incorrectly can lead to serious damage to both vehicles’ electrical systems or even cause injury. To avoid these risks, follow a systematic approach when attaching the cables. Start by connecting one end of the red (positive) cable to the positive terminal of the dead battery. The positive terminal is usually marked with a “+” symbol.
Next, attach the other end of the red cable to the positive terminal of the donor vehicle’s battery. Afterward, take one end of the black (negative) cable and connect it to the negative terminal of the donor battery, which is marked with a “-” symbol. Finally, attach the other end of the black cable to an unpainted metal surface on the dead vehicle, such as a bolt or bracket away from the battery itself. This step helps prevent sparks near the battery, reducing the risk of explosion due to hydrogen gas emissions.
If you find yourself in a situation where your car won’t start due to a dead battery, knowing how to jump start it can be incredibly helpful. For a detailed guide on this process, you can refer to a related article that provides step-by-step instructions and safety tips. This information can be invaluable, especially if you’re in a hurry or unfamiliar with the procedure. To learn more about this essential skill, check out the article on jump starting a car.
Starting the Donor Vehicle and Charging the Dead Battery
Once all connections are secure, start the donor vehicle’s engine and allow it to run for a few minutes. This process enables the donor battery to transfer power to the dead battery through the jumper cables. It is advisable to keep the donor vehicle running at a higher RPM during this time to maximize charging efficiency.
Monitor any changes in the dead vehicle’s electrical systems during this period. You may notice dashboard lights flickering or dimly illuminating as power begins to flow into the dead battery. Allow approximately five to ten minutes for charging before attempting to start the dead vehicle.
If you find yourself in a situation where your car won’t start due to a dead battery, knowing how to jump start it can be incredibly helpful. For a comprehensive guide on this process, you can check out a related article that provides useful tips and tricks. Additionally, while you’re preparing to get your car running again, you might also be interested in learning about effective mosquito yard treatments to keep your outdoor space comfortable. For more information, visit this article that discusses what works and what to avoid.
Attempting to Start the Dead Battery Car
After allowing sufficient time for charging, attempt to start the dead vehicle by turning the ignition key. If successful, you should hear the engine crank and start running smoothly. If it does not start immediately, wait another minute or two before trying again; sometimes, batteries require additional time to accumulate enough charge.
If repeated attempts fail, it may indicate that your battery is beyond recovery or that there are other underlying issues such as a faulty starter motor or alternator. In such cases, further diagnostics may be necessary to identify and resolve any additional problems affecting your vehicle’s performance.
Disconnecting the Jumper Cables Safely
Once your vehicle has successfully started, it is crucial to disconnect the jumper cables in reverse order of how they were connected. Begin by removing the black cable from the unpainted metal surface on your vehicle first, followed by disconnecting it from the donor vehicle’s negative terminal. Next, remove the red cable from your vehicle’s positive terminal and finally disconnect it from the donor vehicle’s positive terminal.
Taking care during this process is essential to avoid accidental short circuits or electrical shocks. Ensure that no metal parts of either cable touch each other while disconnecting them, as this could create sparks or damage electrical components.
Allowing Your Car to Recharge After Jump Starting
After successfully jump-starting your vehicle, it is advisable to allow it to run for at least 20-30 minutes without turning it off. This duration enables your alternator to recharge the battery adequately and restore its power levels. Driving your car during this time is even more beneficial as it allows for optimal charging through increased RPMs.
If you find that your car frequently requires jump-starts, it may indicate an underlying issue with your battery or charging system that needs addressing. Consider having your battery tested at an automotive service center to determine its health and whether replacement is necessary.
Troubleshooting Common Jump Start Issues
Several common issues may arise during jump-starting procedures that require troubleshooting. One frequent problem is poor connections between terminals due to corrosion or loose clamps. Always ensure that connections are tight and free from corrosion before attempting a jump start.
Another issue could be related to an insufficiently charged donor battery. If you suspect this might be the case, try using another vehicle with a fully charged battery or consider using a portable jump starter as an alternative solution.
In some instances, even after jump-starting, your vehicle may stall shortly after starting or fail to hold a charge altogether. This situation could indicate a failing alternator or other electrical system problems that necessitate professional inspection and repair.
Safety Precautions to Avoid Accidents
Safety should always be a priority when jump-starting vehicles. Begin by wearing protective gloves and goggles to shield yourself from potential acid spills or electrical sparks during connections and disconnections. Ensure that both vehicles are parked on level ground away from traffic and that all electronic devices are turned off before starting.
Additionally, avoid smoking or using open flames near batteries since they emit hydrogen gas, which is highly flammable. Always read your vehicle’s owner manual for specific instructions regarding jump-starting procedures unique to your make and model.
Tips for Maintaining Your Car Battery Health
Maintaining optimal battery health can prolong its lifespan and reduce instances of failure. Regularly inspect your battery for signs of corrosion and clean terminals as needed using a mixture of baking soda and water. Ensure that connections are tight and secure at all times.
Additionally, consider having your battery tested annually, especially before extreme weather seasons when performance may be compromised due to temperature fluctuations. Limiting short trips can also help; frequent short drives do not allow sufficient time for batteries to recharge fully.
Lastly, if your vehicle will remain unused for an extended period, consider using a trickle charger or disconnecting the battery altogether to prevent drainage.
In summary, understanding how to properly jump-start a car can save you time and frustration during emergencies. By gathering necessary tools, preparing both vehicles correctly, connecting cables safely, and following proper procedures throughout each step, you can effectively revive a dead battery while ensuring safety for yourself and others involved in the process. Regular maintenance practices will further enhance your car battery’s longevity and reliability over time.
FAQs
What tools do I need to jump start a car?
To jump start a car, you will need a set of jumper cables and a functioning vehicle with a charged battery. Ensure that the jumper cables are in good condition and that the other vehicle is compatible with your car’s battery voltage.
How do I connect the jumper cables correctly?
First, connect one end of the red (positive) jumper cable to the positive terminal of the dead battery. Then, connect the other end of the red cable to the positive terminal of the charged battery. Next, connect one end of the black (negative) cable to the negative terminal of the charged battery, and finally, attach the other end of the black cable to an unpainted metal surface on the dead car, away from the battery.
How long should I let the working car run before starting the dead car?
It is generally recommended to let the working car run for about 5 to 10 minutes to allow the dead battery to charge sufficiently. This time may vary depending on the condition of the dead battery and the power of the working vehicle.
What should I do after the dead car starts?
Once the dead car starts, keep it running for at least 15 to 30 minutes to allow the battery to recharge further. After that, carefully disconnect the jumper cables in the reverse order of how they were connected, ensuring that the cables do not touch each other or any metal surfaces during the process.
Can I jump start a car in cold weather?
Yes, you can jump start a car in cold weather, but it may be more challenging due to the reduced efficiency of batteries in low temperatures. Ensure that the jumper cables are properly connected and allow extra time for the dead battery to charge before attempting to start the vehicle.