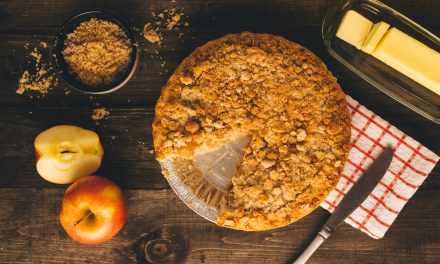
Creating a delectable apple pie begins with the meticulous selection of ingredients. The quality of each component significantly influences the final product, making it essential to gather everything before commencing the baking process. For a classic apple pie, you will need approximately 6 to 8 medium-sized apples, preferably a mix of tart and sweet varieties such as Granny Smith and Honeycrisp. This combination ensures a balanced flavor profile that is both refreshing and indulgent.
In addition to apples, you will require a few staple pantry items: all-purpose flour, granulated sugar, brown sugar, unsalted butter, ground cinnamon, nutmeg, and salt. The butter should be cold to achieve a flaky crust, while the sugars will enhance the natural sweetness of the apples. Ground cinnamon and nutmeg add warmth and depth to the filling, creating an aromatic experience that is quintessentially autumnal. Lastly, don’t forget to have lemon juice on hand; it not only prevents the apples from browning but also adds a subtle tang that brightens the overall flavor.
If you’re looking to complement your homemade apple pie with a delicious main course, you might want to check out this article on how to make easy air fryer garlic butter pork chops. The combination of savory pork chops and sweet apple pie makes for a delightful meal that is sure to impress your family and friends. You can find the recipe here: easy air fryer garlic butter pork chops.
Prepare the Pie Crust Dough
Once all ingredients are gathered, the next step is to prepare the pie crust dough. This foundational element is crucial for achieving that perfect flaky texture that apple pie aficionados crave. Begin by combining 2 ½ cups of all-purpose flour with 1 teaspoon of salt in a large mixing bowl. This mixture serves as the base for your crust, providing structure and stability.
Next, incorporate 1 cup of cold unsalted butter, cut into small cubes. Using a pastry cutter or your fingertips, work the butter into the flour mixture until it resembles coarse crumbs. This process is vital; overworking the dough can lead to a tough crust. Once the butter is adequately incorporated, add 6 to 8 tablespoons of ice-cold water gradually, mixing until the dough just comes together. Be cautious not to overmix; you want to maintain those small pockets of butter for optimal flakiness.
Chill the Dough for Optimal Texture

After forming the dough, it is imperative to chill it before rolling it out. Chilling allows the gluten to relax and the butter to firm up, which contributes to a tender and flaky crust. Divide the dough into two equal portions, shaping each into a disc. Wrap them tightly in plastic wrap and refrigerate for at least 1 hour. This step is not merely a suggestion; it is essential for achieving the desired texture.
While the dough chills, you can take this opportunity to clean your workspace and prepare for the next steps in your pie-making journey. A well-organized kitchen enhances efficiency and minimizes stress during the baking process. Additionally, consider preheating your oven to 425°F (220°C) so that it is ready when your pie is assembled.
Peel, Core, and Slice the Apples

With your dough chilling in the refrigerator, it’s time to focus on the star ingredient: the apples. Begin by peeling each apple using a vegetable peeler or paring knife. Removing the skin not only improves texture but also allows the spices and sugars to penetrate the fruit more effectively. After peeling, proceed to core each apple using an apple corer or a knife, ensuring that all seeds and tough core sections are removed.
Once cored, slice the apples into uniform pieces—about ¼ inch thick is ideal. Uniformity in size ensures even cooking during baking, preventing some slices from becoming mushy while others remain firm. Aim for approximately 6 cups of sliced apples; this quantity will fill your pie generously without overflowing. As you slice, consider tossing the apples with a bit of lemon juice to maintain their vibrant color and prevent browning.
If you’re looking to enhance your culinary skills, making homemade apple pie from scratch is a delightful project that can fill your kitchen with wonderful aromas. To ensure your baking experience is as enjoyable as possible, you might want to check out this helpful article on how to keep pesky house flies out of your home, which can be particularly useful when you’re preparing delicious treats. For more details, you can read the article here. With a clean and inviting space, your apple pie will be the star of the show!
Mix the Apple Filling with Spices and Sugar
Now that your apples are prepped, it’s time to create a flavorful filling that will elevate your pie to new heights. In a large mixing bowl, combine your sliced apples with ¾ cup of granulated sugar and ¼ cup of brown sugar. The granulated sugar provides sweetness while the brown sugar adds depth and moisture due to its molasses content.
To enhance the flavor profile further, sprinkle in 1 teaspoon of ground cinnamon and ¼ teaspoon of nutmeg. These spices are traditional in apple pie recipes and contribute warmth and complexity to each bite. Additionally, add 2 tablespoons of all-purpose flour; this will help thicken the juices released by the apples during baking, preventing a soggy bottom crust. Toss everything together gently until all apple slices are evenly coated with the sugar and spice mixture.
If you’re looking to elevate your baking skills, making homemade apple pie from scratch can be a delightful experience. Not only does it fill your kitchen with a warm, inviting aroma, but it also allows you to customize the flavors to your liking. For those interested in enhancing their culinary repertoire, you might find inspiration in a related article that offers valuable insights into various cooking techniques and tips. Check out this informative piece on cooking techniques that can help you perfect your pie-making process. Enjoy the journey of creating a delicious dessert that brings joy to your table!
Roll Out the Bottom Pie Crust
With your filling prepared, it’s time to roll out the bottom crust. Retrieve one of your chilled dough discs from the refrigerator and place it on a lightly floured surface. Using a rolling pin, gently roll out the dough into a circle about 12 inches in diameter and approximately ⅛ inch thick. Ensure that you rotate the dough frequently to maintain an even thickness and prevent sticking.
Once rolled out, carefully transfer the dough into your pie dish by folding it over your rolling pin and unrolling it into place. Gently press the dough into the dish, ensuring there are no air pockets beneath it. Trim any excess dough hanging over the edges with a sharp knife or kitchen scissors, leaving about an inch overhang for crimping later on.
Add the Apple Filling to the Crust
Now comes one of the most satisfying moments in pie-making: adding the apple filling to your prepared crust. Spoon the apple mixture into the bottom crust evenly, ensuring that it is piled high in the center for an appealing presentation once baked. The filling should be heaped slightly above the edge of the crust; this allows for settling during baking while still maintaining an attractive shape.
As you fill your pie, take care to distribute any excess juices evenly over the apples. These juices will caramelize during baking, creating a luscious sauce that binds everything together beautifully. Once filled, set aside your pie while you prepare the top crust.
Roll Out and Place the Top Crust
The top crust is equally important in achieving that classic apple pie aesthetic and flavor balance. Retrieve your second chilled dough disc from the refrigerator and repeat the rolling process as you did with the bottom crust. Aim for a similar diameter of about 12 inches and a thickness of ⅛ inch.
Once rolled out, you have several options for placing it atop your apple filling: you can either lay it whole over the filling or cut it into strips for a lattice design. If opting for a lattice top, cut your rolled-out dough into strips approximately ¾ inch wide before weaving them over and under each other across the filling. This technique not only looks stunning but also allows steam to escape during baking.
Seal and Crimp the Pie Edges
After placing your top crust over the filling—whether whole or lattice—it’s time to seal and crimp those edges for a polished finish. Begin by trimming any excess dough from both crusts so they are even with one another. Fold the edges under themselves to create a thicker border that can be crimped together.
Using your fingers or a fork, crimp along the edges to create decorative patterns while ensuring a tight seal that prevents juices from leaking out during baking. This step is crucial; an unsealed pie may result in a messy oven cleanup later on! Once crimped, consider adding additional decorative touches such as fluted edges or cut-out shapes from leftover dough.
Cut Vent Holes and Brush with Egg Wash
Before placing your pie in the oven, it’s essential to allow steam to escape during baking by cutting vent holes in your top crust. Use a sharp knife or kitchen scissors to create several small slits or shapes—such as leaves or stars—across the surface of your pie. This not only serves a functional purpose but also adds an artistic flair.
To achieve that golden-brown finish on your crust, brush it lightly with an egg wash made from one beaten egg mixed with a tablespoon of water or milk. This step enhances browning while providing a beautiful sheen that elevates your pie’s visual appeal.
Bake the Pie to Golden Perfection
Finally, it’s time for your masterpiece to enter the oven! Preheat your oven to 425°F (220°C) if you haven’t already done so. Place your assembled pie on a baking sheet lined with parchment paper—this will catch any drips that may occur during baking—then bake for approximately 45-55 minutes or until golden brown and bubbling.
Keep an eye on your pie as it bakes; if you notice excessive browning on the edges before it’s fully cooked, cover them with strips of aluminum foil to prevent burning while allowing the center to finish cooking through. Once baked to perfection, remove your pie from the oven and allow it to cool on a wire rack for at least two hours before slicing; this cooling period helps set the filling for cleaner slices.
In summary, crafting an exquisite apple pie involves careful preparation and attention to detail at every stage—from gathering quality ingredients to mastering techniques for rolling dough and sealing edges. By following these steps diligently, you can create a dessert that not only delights taste buds but also warms hearts during gatherings with family and friends. Enjoy every bite of this timeless classic!
FAQs
What ingredients do I need to make homemade apple pie from scratch?
To make homemade apple pie from scratch, you will need the following ingredients: 2 to 3 pounds of apples (such as Granny Smith or Honeycrisp), 1 cup of granulated sugar, 2 tablespoons of all-purpose flour, 1 teaspoon of ground cinnamon, 1/4 teaspoon of nutmeg, 1 tablespoon of lemon juice, and a pinch of salt. Additionally, you will need ingredients for the pie crust, which typically include 2 1/2 cups of all-purpose flour, 1 teaspoon of salt, 1 tablespoon of sugar, 1 cup of unsalted butter (cold and cubed), and 6 to 8 tablespoons of ice water.
How do I prepare the apples for the pie filling?
To prepare the apples for the pie filling, start by peeling, coring, and slicing the apples into thin, even pieces. This ensures they cook evenly during baking. Once sliced, toss the apples in a bowl with lemon juice to prevent browning. Then, mix in the sugar, flour, cinnamon, nutmeg, and salt to create a flavorful filling. Allow the mixture to sit for about 10-15 minutes to let the flavors meld.
What is the best way to make the pie crust from scratch?
To make the pie crust from scratch, combine the flour, salt, and sugar in a large bowl. Cut in the cold, cubed butter using a pastry cutter or your fingers until the mixture resembles coarse crumbs. Gradually add ice water, one tablespoon at a time, mixing until the dough comes together. Divide the dough into two discs, wrap them in plastic wrap, and refrigerate for at least 1 hour before rolling out.
How long should I bake the apple pie and at what temperature?
Bake the apple pie in a preheated oven at 425°F (220°C) for 15 minutes. Then, reduce the temperature to 350°F (175°C) and continue baking for an additional 35 to 45 minutes, or until the apples are tender and the crust is golden brown. To prevent over-browning, you can cover the edges of the pie with aluminum foil during the last 15 minutes of baking.
How can I tell when the apple pie is done baking?
You can tell the apple pie is done baking when the crust is golden brown and the filling is bubbling through the vents or slits in the top crust. Additionally, you can insert a knife or fork into the apples to check for tenderness. If they are soft and easily pierced, the pie is ready to be removed from the oven. Allow the pie to cool for at least 2 hours before slicing to let the filling set.